How to Create a new Item in Intacct
Create a new item in Intacct
Intacct allows items to be goods or services. An item can be something you purchase from a vendor, or something you sell to a customer.
![]() Please Note: Depending on your Company Subscriptions you can find items in the Projects, Purchasing, Order Entry or Inventory Control modules under Lists.
Please Note: Depending on your Company Subscriptions you can find items in the Projects, Purchasing, Order Entry or Inventory Control modules under Lists.
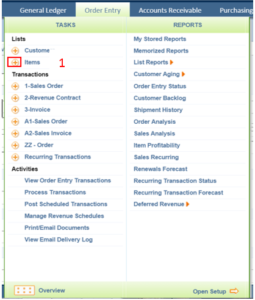
1. To create a New Item, from the Order Entry Menu, select the ![]() plus sign next to Items
plus sign next to Items
2. Click on the drop down arrow for Item Type, select the correct type for the item. Some common choices are: Inventory, Non-Inventory, Non-Inventory (Purchasing/Sales), Kits. Depending on your company configuration different Item types and options may be listed.
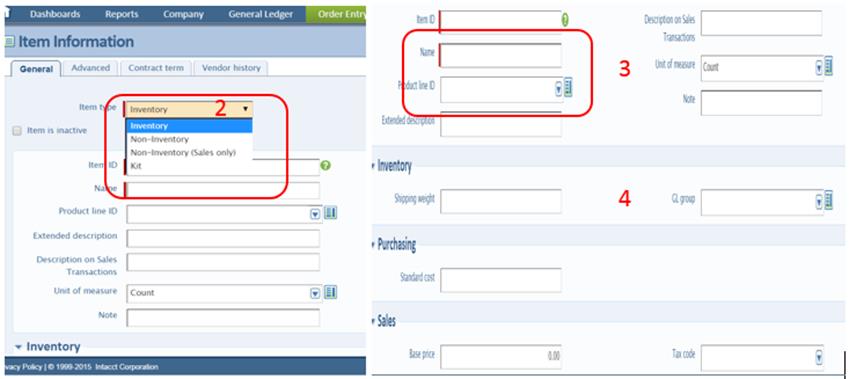
3. Input a unique Item ID & Name. If you have many items to enter into the system you can save time by uploading them using a .cvs file. ![]() Please note: Again, depending on your company configuration a specific format for the Item ID, may be necessary.
Please note: Again, depending on your company configuration a specific format for the Item ID, may be necessary.
4. Complete any of the optional information for this item which includes a detailed description of the item, the General Ledger accounts that you want associated with this item. Information that is unique to this item, such as cost, base price, shipping weight, and taxability. (If you integrated AvaTax, you should enter the tax code for automatic tax computation in transactions that include this item.)
- If the VSOE tab displays, set default values for item delivery status and item or bundle deferral and specify the type of product or service to which VSOE applies.
- If the Warehouse tab displays enter certain item related details about the Warehouse such as the Warehouse ID, cost for that item, reorder and quantity information and sell dates. In the future, this will help keep items in stock, track pricing and delivery schedules. To enter details for a specific item, click the Show Details tab of the item you are updating. Here, you can enter information such as storage area.
- If the Kits Component tab displays, enter information about each component of this kit. Use the Kits Component section to select the items that comprise the kit. You can select as many items as necessary. The revenue can be split over multiple GL accounts or you can defer the revenue for some or all of the components.
- If the Contract Term tab displays you can use the boxes to specify whether an item is a contract and then define some of the terms of that contract.
- If the Vendor History tab displays you can enter certain item related details about the vendor, such as the Vendor ID, the vendors stock number for this item, and the lead time required for this vendor to deliver the item. In the future this information can be utilized for optimal pricing and delivery times of the items you work with.

